Schema Generator - Columns
Here you enter the columns for your tables.
You should note that primary and foreign key columns are automatically created for you based on the Relationship you defined between the tables, so you will not need to create these.
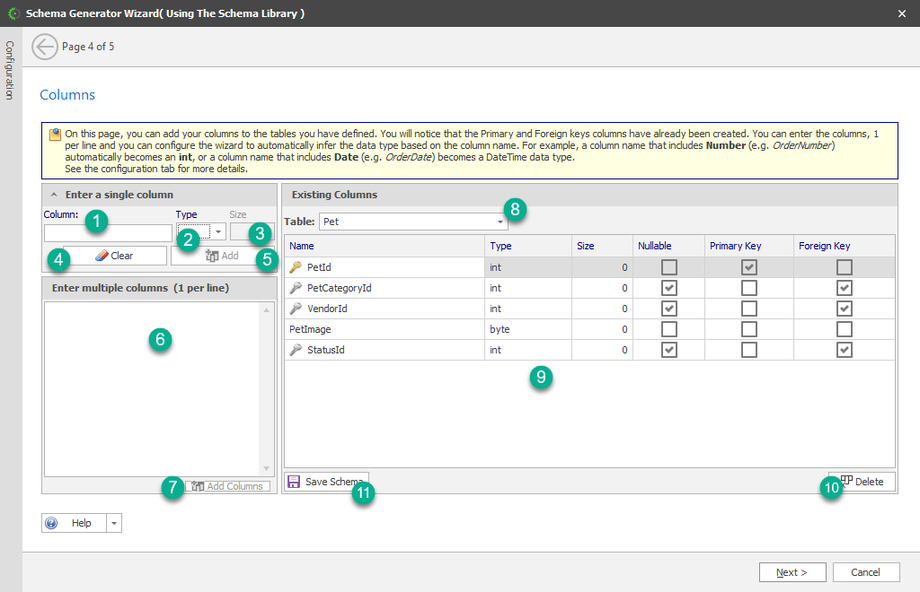
- Column - This is where you specify the name of the column.
- Type - Here you can specify the data type for the column.
- Size - You can specify the size of the column. This usually applies to string-based data types.
- Clear - You can reset whatever entries you have inputted in (1), (2), and (3) using this button.
- Add - Once you have filed (1), (2), and (3) this button will create a column and will be listed in (9).
- Multiple Columns - You can specify multiple columns for faster column generation here. You specify one column per line. See Data Type Expansion on how to speed up column creation.
- Add Columns -
- Table - This droplist allows you to select what has already been defined in Tables.
- Existing Columns - This shows all the columns already created.
- Delete - This will delete whatever column is highlighted.
- Save Schema - You can save whatever you have done so far with this button.
You can speed up the creation of columns with shortened tags/letters enclosed in parentheses. This works in conjunction with configuration settings. For example:
FirstName(s25) will create a string column named "FirstName" of size 25
StartDate(d) will create a DataTime column named "StartDate".
The following letter(s) will expand to the necessary data type:
| b - bool | by - byte | sb - sbyte | c - char |
| l - long | ul - ulong | o - object | s - short |
| de - decimal | f - float | i - int | ui - uint |
| us - ushort | d - datetime | s - string | gu - guild |
Click NEXT to continue.

